
Glamping in South Africa: How to Set Up the Perfect Glamping Site
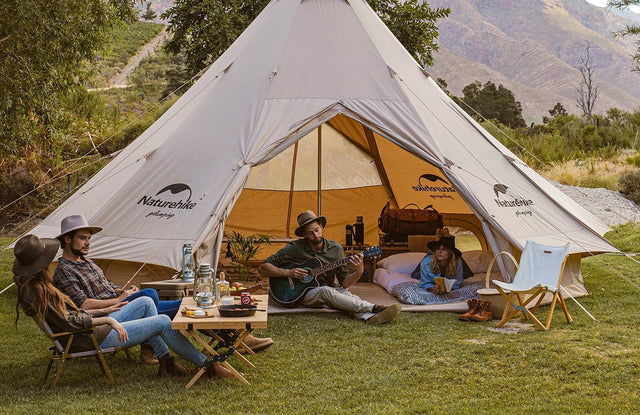
Setting up a glamping site comes down to four layers built in order: a standing-height tent pitched on level ground that drains, then a proper sleep system, then layered lighting, then furniture and a camp kitchen arranged around how you actually move through camp. Get the pitch and the tent right and everything after that is decoration. Get them wrong and no amount of fairy lights will rescue the weekend.
The mistake almost everyone makes on their first attempt is buying the tent first and thinking about the ground last. A beautiful cotton bell tent on a slope you can barely see still means everyone wakes up bunched against the downhill wall at 3am. This guide works through the setup in the order that matters for South African conditions,
Pick the Pitch Before You Buy Anything
Walk the site before you unpack anything. You want ground that is level and drains away from where you will sleep. Stay clear of the drip line of any big tree, because loose branches come down in Highveld thunderstorms and those storms arrive most afternoons through November to February.
Check where the wind is coming from and point your door away from it. Around Cape Town and up the West Coast the south-easter will find the smallest gap in a badly oriented tent and turn the inside into a wind tunnel. In the Karoo the wind matters less than the temperature swing, where a 30 degree afternoon can fall into single digits overnight.
Clear the footprint properly before the groundsheet goes down. Stones and roots you can barely feel through a shoe will feel like bricks through a sleeping pad at 2am. An 80L folding storage box keeps the site tidy while you work, and a tidy site is the difference between a camp that looks considered and one that looks like a boot exploded.
How to Choose Between Glamping Tents
The best glamping tents for South African conditions are cotton or polycotton canvas models with full standing height. Canvas breathes in Lowveld humidity and sits noticeably cooler under direct sun than polyester, which turns a tent into an oven by nine in the morning. Standing height is the actual line between camping and glamping, because once you can stand up to dress, everything else in the setup starts to make sense.
Naturehike's range covers four different approaches to that problem, and the right one depends less on your budget than on who is pitching the thing and when you plan to arrive.
|
Tent style |
Best for |
Pitching |
Naturehike model |
|
Cotton pyramid |
Couples wanting the classic canvas look |
Slowest, one centre pole plus careful pegging |
|
|
Cotton wall tent |
Two people who want headroom throughout |
Moderate, frame and canvas separate |
|
|
Air-pole cotton |
Anyone pitching alone or arriving after dark |
Fastest, inflate the beams and peg out |
|
|
Instant cabin |
Families of four to eight |
Fast, the frame opens out in one motion |
Arriving at a Cederberg farm site at half past five in winter, with maybe forty minutes of usable light left, changes the calculation completely. An inflatable air-pole model goes up while a pyramid tent is still being unrolled. That single decision does more for the mood of the first evening than any amount of styling.
What is the difference between camping and glamping?
Camping is about carrying less. Glamping is about carrying better. A backpacking tent is measured in grams saved, while a glamping tent is measured in ceiling height and the quality of the sleep underneath it. The gear is heavier, the pack-down is slower and the trade is a night that feels closer to a guest house than a hike.
Build the Bed Before You Build the Look
The bed does more for the experience than every decorative touch combined. Skip the air mattress, which sounds like the luxury option and behaves like a cold plate once air starts circulating underneath you. A self-inflating pad traps a layer of foam between you and the ground instead, which is why the C10 self-inflating double at R3,999 outperforms a mattress at half the price on a July night in Underberg.
Match the sleeping bag to where you are actually going, not to where you imagine going. Summer on the KZN coast asks almost nothing of a bag, and the Washable Sleeping Bag from R899 handles it comfortably. A winter night in the Drakensberg foothills is a different problem, and the Oval Sleeping Bag from R2,299 exists for that end of the range.
Ratings printed on a bag are a starting point rather than a promise, since how warm you sleep depends on the pad underneath you, what you eat before bed and how much you have been sweating. Our guide to cold weather bags works through how those ratings are set and where they mislead people. Add a rug or a mat at the tent door before anything else goes in, because canvas floors get cold and everything tracked in from outside stays in until you leave.
Light the Camp in Three Layers
Lighting is where a decent setup turns into a memorable one, and it takes three separate light sources doing three different jobs.
-
Ambient light goes around the outside, where 20 metres of solar string lights from R349 draws the shape of the camp against the dark.
-
Task light sits where you cook and wash up, bright enough to see a knife and a pan properly.The third layer is the one people forget. A warm, low light inside the tent, something like the Star Trail retro atmosphere lamp from R1,099 or the portable atmosphere light at R699, is what makes canvas glow from the outside at dusk. That glow is the picture everyone takes.
Keep every light on rechargeable batteries or solar and charge them during the day. South African sun does that work for free, and it removes the one failure that ruins a night in the bush, which is a dead torch at nine in the evening with the braai still going.
Do you need power for a glamping setup?
No. Plenty of South African bush camps, private farm sites and Karoo stopovers have no plug point at the stand at all, and a well-planned glamping setup runs without one. Charge lights and power banks off solar through the day, keep a cooler bag from R699 for perishables rather than depending on a fridge and cook on gas or coals. Power becomes a convenience rather than a requirement.
Outdoor Furniture That Earns Its Space in the Boot
Shade comes before seating in most of this country. A gazebo shelter with sides at R7,649 turns a hot stand in Limpopo or the Kruger into somewhere you can actually sit between eleven and three, which is exactly when a tent interior becomes unusable. Pitch it before the chairs come out and the rest of the day organises itself around it.
For seating, the honest question is boot space rather than comfort, since almost everything is comfortable enough. A pair of X-shaped moon chairs at R699 each disappears into a hatchback boot, while the adjustable deck chair at R1,999 needs a bakkie and rewards you with something you can genuinely fall asleep in. Our chairs buying guide breaks the range down by weight and pack size.
Add one table you can eat at properly. A large aluminium folding table at R1,999 gives four people a real surface, and eating off a proper table instead of your knees is a bigger upgrade than most decorative additions. A canvas hammock at R1,899 slung between two thorn trees costs less than a chair and gets used more than either.
Set the Camp Kitchen Up Around the Braai
Every guide written overseas puts a portable stove at the centre of the camp kitchen. In South Africa the fire is the centre and the stove is the backup. A portable folding stainless steel braai from R1,199 packs flat and sets up in under a minute, which matters when you arrive late and the coals need an hour's head start.
Position the fire downwind of the tent and at least a few metres clear of the canvas. Smoke gets into cotton and stays there for months, and a spark landing on a R12,000 tent is a very expensive lesson. Keep a cast iron pan from R2,099 for anything that needs to sit on coals and a titanium grill at R699 for the lighter jobs.
Carry gas as a backup rather than an afterthought. Fire bans run through the dry Western Cape summer and across parts of the Cape Fold mountains, and arriving at a site to find open fires prohibited turns a coals-only plan into a cold dinner. The full kitchen range covers both approaches, and having the second one in the boot costs nothing until the day it saves the trip.
What South African Weather Does to Cotton Canvas
Cotton canvas rewards care and punishes neglect faster here than in cooler climates. The single rule that matters is never pack a tent away damp. Mould takes hold within days in a garage in Durban or anywhere along the KZN coast, and once it is in the fibres it does not come out.
If you pack up in rain, and in the Cape winter you will, get the tent open and drying within twenty-four hours of getting home. A lawn on a dry morning is enough. UV is the slower threat, since South African sun degrades canvas and stitching over seasons rather than days, so a tent left standing for a fortnight in the Kalahari ages faster than one that comes down every few days.
New cotton tents also need weathering before you trust them in real rain. Pitch it at home, wet it thoroughly with a hose, let it dry fully and repeat. The fibres swell and close the needle holes left by the stitching, which is what makes canvas waterproof in the first place.
How much does it cost to set up a glamping site in South Africa?
A complete two-person setup built from Naturehike's range runs to roughly R21,000 at current pricing. That is a Village 5.0 4P tent at R11,999, a C10 self-inflating double pad at R3,999, two washable sleeping bags at R899 each, solar string lights at R349, two moon chairs at R699 each and an aluminium folding table at R1,399. The tent is around sixty percent of that total, which is the argument for buying the tent properly and adding the rest across a few seasons.
Can you glamp in your own back garden?
Yes, and doing it once before you drive anywhere is the best decision on this list. A trial pitch on the lawn tells you how long the tent actually takes to put up, whether your pegs hold in your soil type and how the lighting reads after dark. Discovering a missing pole bag in Sandton on a Thursday evening is a minor annoyance, while discovering it in the Cederberg on a Friday night is a ruined weekend.
Start With the Tent, Add the Rest Over Time
Almost nobody buys a full glamping setup in one go, and almost nobody should. Buy the tent properly first, because it is the piece that determines whether the whole thing works and the piece you will keep the longest. Bedding, lighting and furniture can arrive one trip at a time as you learn what you actually reach for.
The full glamping range is available with delivery across South Africa, free on orders over R1,999.


0 Comments
There are no comments for this article. Be the first one to leave a message!